There is a reason silk hair is the universal aspiration across every culture, every age group, and every hair type on the planet. Smooth, luminous, frizz-free, and deeply nourished — silk hair is not merely an aesthetic goal. It is a reflection of hair that is genuinely healthy at every structural level, from the innermost cortex to the outermost cuticle layer that gives hair its characteristic shine and smoothness.
But here is what most people misunderstand about silk hair: it is not a hair type you are born with or without — it is a condition you create and maintain through consistent, intelligent hair care.
The difference between hair that looks dull, frizzy, brittle, and lifeless and hair that falls with a smooth, glossy silk-like quality is almost never genetic destiny. It is almost always the cumulative result of washing habits, drying techniques, heat tool usage, product choices, and the dozen small decisions that collectively constitute a hair care routine.
In 2026, the science of hair care has reached a level of sophistication that makes achieving genuinely silk-smooth hair more accessible than at any previous point in history. We understand precisely how the hair cuticle responds to pH, heat, and mechanical stress. We know which ingredients seal the cuticle, which proteins rebuild damaged cortex structure, and which oils create the barrier that maintains moisture balance between washing sessions. And we understand the specific mistakes — some of them remarkably common — that systematically destroy hair’s natural smoothness and strength over time.
This comprehensive guide brings all of that knowledge together into a practical, actionable silk hair care routine — covering every step from washing and conditioning through drying, heat styling, overnight protection, and long-term maintenance. Whether your hair is naturally straight, wavy, curly, fine, thick, color-treated, or chemically processed, the principles in this guide apply universally — with specific guidance for different hair types where relevant.
Understanding Hair Structure: The Foundation of Silk Hair Care
Before building an effective routine, understanding what silk hair actually means at a structural level transforms your approach from guesswork into precision.
The Three Layers of a Hair Strand
The Medulla: The innermost core of the hair strand — present in thick hair but often absent in fine hair. The medulla’s role in hair appearance and texture is minimal, but its presence contributes to hair’s overall structural integrity.
The Cortex: The thick middle layer that constitutes the majority of each hair strand’s mass. The cortex contains the melanin that gives hair its color and the keratin proteins that provide hair with its strength, elasticity, and structural integrity. When people talk about hair being damaged or healthy at a deep level, they are talking about the cortex. Chemical processes — coloring, bleaching, perming, relaxing — all work by altering the cortex structure.
The Cuticle: The outermost layer — and the one most directly responsible for whether hair looks and feels silky or rough. The cuticle is composed of overlapping scale-like cells — imagine the scales of a fish or the overlapping tiles of a roof — that lie flat against each other when hair is healthy, creating a smooth, reflective surface that gives silk hair its characteristic luminosity.
When the cuticle is damaged — through heat, mechanical stress, chemical processing, or pH disruption — these scales lift away from the hair shaft, creating a rough, uneven surface that scatters light rather than reflecting it, traps environmental moisture causing frizz, and allows the cortex to lose its internal moisture rapidly.
The fundamental goal of silk hair care is to keep the cuticle flat, intact, and protected.
Every step in an effective silk hair care routine serves this goal — either maintaining cuticle integrity, repairing lifted or damaged cuticles, or protecting against the forces that lift and damage them.
The Role of pH in Hair Health
One of the most important and least understood concepts in hair care is the role of pH. Healthy hair and scalp have a naturally slightly acidic pH — between 4.5 and 5.5 on the pH scale. At this pH, the cuticle scales lie flat and the hair fiber is in its optimal structural state.
Many common hair care mistakes disrupt this pH balance. Alkaline products — including many shampoos with high detergent concentrations, baking soda washes, and hard water — raise hair’s pH above its optimal range, causing cuticle scales to lift. This is the chemical explanation for why certain shampoos leave hair feeling rough, why hard water creates frizz, and why acidic rinses like diluted apple cider vinegar temporarily smooth hair.
Understanding pH helps you make smarter product choices — selecting shampoos, conditioners, and treatments formulated within hair’s optimal pH range for maximum cuticle-sealing benefit.
Part One: The Silk Hair Washing Routine
Washing is the most frequent and highest-impact step in any hair care routine — and it is also where the majority of hair damage begins. The following framework transforms washing from a potentially damaging necessity into a genuinely restorative experience.
Step 1: Pre-Wash Oil Treatment — The Most Underutilized Silk Hair Technique
The single most transformative addition most people can make to their hair washing routine is one that happens before water even touches their hair — the pre-wash oil treatment.
Why pre-washing with oil matters:
Water is not inherently gentle on hair. When dry hair is rapidly wetted, it swells as water molecules penetrate the hair shaft — a process called hygral fatigue when it occurs repeatedly without protection. This repeated swelling and contracting cycle weakens hair’s internal protein bonds over time, making hair progressively more porous, fragile, and prone to breakage.
Applying oil to hair before washing creates a protective coating that slows water absorption — allowing hair to wet more gradually and uniformly, reducing the mechanical stress of rapid swelling. It also prevents shampoo from stripping the hair shaft completely of its natural lipid coating — maintaining a baseline of moisture and natural oils even after thorough cleansing.
Best oils for pre-wash treatment:
Coconut oil is the most scientifically validated pre-wash oil — research published in the Journal of Cosmetic Science demonstrated that coconut oil’s unique ability to penetrate the hair shaft (due to its low molecular weight and straight chain structure) makes it the most effective oil for reducing protein loss during washing. Apply to lengths and ends — avoiding the scalp if you are prone to scalp oiliness — thirty minutes to two hours before washing, or overnight for intensive treatment.
Other excellent pre-wash oils include argan oil (particularly beneficial for color-treated hair), castor oil (for hair growth support and thickness), olive oil (for deep nourishment of dry, thick hair), and almond oil (for fine to medium hair that needs lightweight moisture).
How to apply pre-wash oil correctly:
Warm the oil slightly between your palms to improve penetration. Apply to dry hair in sections from mid-length to ends — the areas most vulnerable to damage and most in need of protection. Do not apply heavily to roots unless your scalp is very dry. Leave for a minimum of thirty minutes — longer if possible. Then proceed with shampooing.
Step 2: Pre-Wash Scalp Detox (Weekly or Bi-Weekly)
The health of your hair begins at your scalp. A scalp that is congested with product buildup, excess sebum, or environmental pollutants creates an inhospitable environment for optimal hair growth and health. A regular scalp detox — performed before washing — addresses these issues at the source.
How to perform a scalp detox:
Divide dry hair into sections and apply a scalp-specific treatment directly to the scalp — not the lengths. Options include a dedicated scalp scrub containing gentle exfoliating particles (like bamboo or brown sugar), a salicylic acid scalp treatment for oily or flaky scalps, or a simple mixture of a few drops of tea tree oil diluted in a carrier oil for antimicrobial cleansing.
Massage the treatment into the scalp using the pads of your fingertips — never your nails — with circular motions for three to five minutes. This massage simultaneously exfoliates the scalp surface, stimulates blood circulation (which supports hair follicle health), and loosens buildup before shampooing.
Leave for five to ten minutes before rinsing and proceeding with your regular shampoo step.
Step 3: Water Temperature — The Often-Overlooked Variable
The temperature of water used for washing has a direct and immediate impact on cuticle behavior. Hot water causes the cuticle scales to open — which facilitates cleaning but leaves hair temporarily vulnerable and rough after washing. Cold water causes the cuticle to contract and flatten — which is why a cold water rinse after conditioning consistently leaves hair feeling smoother.
The optimal washing temperature approach:
Begin washing with lukewarm water — warm enough to effectively dissolve product buildup and sebum but not hot enough to cause aggressive cuticle opening. Many hair care professionals recommend a progressive temperature reduction — starting slightly warmer for the shampoo phase and gradually cooling through the conditioning phase — to maximize the benefits of each step.
Never use very hot water on hair regardless of how comfortable it feels in the shower. The immediate pleasure of hot water comes at a significant cost to cuticle integrity and moisture retention.
Step 4: Choosing and Applying the Right Shampoo
Shampoo selection is one of the most consequential product decisions in a silk hair care routine — and the market’s most heavily marketed shampoos are often not the best choices for achieving genuine hair smoothness and health.
What to look for in a silk hair shampoo:
Sulfate-free formulations — products that clean through gentle surfactant systems rather than the harsh sodium lauryl sulfate (SLS) or sodium laureth sulfate (SLES) found in many commercial shampoos. Sulfates are highly effective cleansing agents, but their aggressiveness strips the hair of its natural lipid coating and raises hair’s pH significantly — both directly damaging to cuticle integrity.
Look for shampoos formulated with gentle surfactants such as sodium cocoyl isethionate, cocamidopropyl betaine, or decyl glucoside — these clean effectively without the stripping action of SLS-based formulations.
pH-balanced formulations — ideally between 4.5 and 5.5 — support cuticle health at the chemical level. Some premium hair care brands now include pH indicators on packaging — look for this information as a mark of sophisticated formulation.
How to apply shampoo for silk results:
Wet hair thoroughly with lukewarm water before applying shampoo — this distributes the shampoo more evenly and requires less product for effective cleansing. Apply shampoo primarily to the scalp — not the lengths. The scalp produces sebum and accumulates the majority of environmental buildup — it needs thorough cleansing. The lengths are cleaned adequately by the diluted shampoo water running through them during rinsing.
Use the pads of your fingertips to massage shampoo into the scalp with gentle circular motions. Never pile hair on top of the head and scrub — this creates mechanical friction and tangles that directly damage cuticle integrity.
Rinse thoroughly — incomplete shampoo removal is a common cause of dullness and buildup.
Frequency of washing:
Contrary to the conventional advice that was popular in previous decades, daily washing is not inherently damaging when done with the right products and technique. However, for most hair types, washing every two to three days allows natural scalp oils to distribute through the lengths, providing natural conditioning and protection. Those with very oily scalps may need daily washing — those with dry, thick, or curly hair often benefit from washing only once or twice weekly.
Step 5: Conditioning — The Cuticle-Sealing Essential
If shampoo is the cleaning step, conditioner is the repair and protection step — and it is non-negotiable in any silk hair care routine.
How conditioner works:
Conditioner works primarily through two mechanisms. First, its slightly acidic pH (typically 3.5 to 4.5 in well-formulated products) causes the cuticle scales that opened during shampooing to contract and flatten — physically smoothing the hair surface. Second, its active ingredients — typically quaternary ammonium compounds (quats) that are positively charged — are attracted to the negatively charged damaged areas of hair fiber, depositing a smooth, lubricating film that reduces friction between hair strands and improves both feel and manageability.
How to apply conditioner correctly for silk results:
Apply conditioner primarily to the mid-lengths and ends of hair — the areas furthest from the scalp that receive the least natural oil and sustain the most cumulative damage. Applying conditioner heavily to the scalp and roots typically results in greasy, weighed-down roots without commensurate benefit to the lengths.
For fine hair, use a lightweight leave-in or rinse-out conditioner applied sparingly from mid-length to ends to avoid weight and limpness.
For thick, dry, or curly hair, use a generous amount of a rich, creamy conditioner and distribute thoroughly from root-adjacent areas to ends.
Leave conditioner in for a minimum of two to three minutes — longer contact time allows active ingredients to penetrate and work more effectively. For a deep conditioning treatment, apply to hair and leave for fifteen to thirty minutes under a shower cap or warm towel for enhanced penetration.
The cold water final rinse:
After rinsing conditioner with lukewarm water, perform a final brief rinse with the coldest water you can tolerate. This cold rinse causes the cuticle to contract rapidly — sealing the smooth, flat surface that the conditioner has created. The result is immediately tangible — hair feels smoother and looks shinier after a cold rinse than after a lukewarm one.
Step 6: Deep Conditioning Treatment (Weekly)
Beyond regular rinse-out conditioning, a weekly deep conditioning treatment delivers intensive repair and nourishment that maintains silk-smooth hair quality over the long term — particularly important for color-treated, heat-styled, or chemically processed hair.
Types of deep conditioning treatments:
Protein treatments: Formulated with hydrolyzed proteins — keratin, wheat, silk, or quinoa protein — that penetrate the hair shaft and temporarily fill gaps in damaged cortex structure. Essential for hair that breaks easily, stretches excessively when wet, or feels consistently weak. Use every two to four weeks for damaged hair, monthly for maintenance.
Moisture treatments: Rich, emollient formulations focusing on deep hydration — typically containing shea butter, avocado oil, honey, or aloe vera. Essential for dry, brittle, or dehydrated hair. Can be used weekly without the risk of protein overload that can make hair feel stiff.
Bond-building treatments: Advanced formulations containing maleic acid, bis-aminopropyl diglycol dimaleate, or similar bond-repairing actives that rebuild broken disulfide bonds within the hair cortex. The most sophisticated and effective option for severely damaged, bleached, or chemically processed hair — products in this category include Olaplex, K18, and similar bond-multiplier treatments.
How to maximize deep conditioning results:
Apply your deep conditioner to clean, towel-blotted (not soaking wet) hair for maximum concentration at the hair fiber surface. Divide hair into sections and apply generously from root to tip. Cover with a shower cap and apply gentle heat — either from a hooded dryer, a heated cap, or simply wrapping the shower cap in a warm towel — for twenty to thirty minutes. Heat opens the cuticle slightly, allowing deeper penetration of conditioning actives into the cortex.
Part Two: The Silk Hair Drying Routine
The transition from wet to dry is one of the highest-risk phases of any hair care routine. Wet hair is in its most vulnerable state — swollen with water, structurally weakened, and highly susceptible to mechanical damage from friction and stretching.
Step 7: The Microfiber Towel — The Essential Drying Upgrade
The first and most impactful upgrade most people can make to their drying routine costs almost nothing and takes seconds to implement: replacing a conventional bath towel with a microfiber hair towel or a soft cotton T-shirt for the initial hair drying step.
Why conventional towels damage hair:
Standard bath towels are woven from thick cotton loops that create significant surface friction when rubbed against wet hair. This friction physically lifts and damages the cuticle scales — creating the rough, frizzy texture that many people struggle with and incorrectly attribute to their hair type rather than their drying technique.
The habitual practice of vigorously rubbing wet hair with a bath towel is one of the single most damaging things you can do to hair — and it happens immediately after washing, when hair is at its most vulnerable.
How to use a microfiber towel correctly:
Gently squeeze excess water from hair — never wring or twist. Place the microfiber towel over your head and gently press and scrunch — never rub — to absorb surface water. The microfiber material absorbs water far more efficiently than cotton terry cloth and creates dramatically less surface friction.
For curly hair specifically, the scrunch technique with a microfiber towel or cotton T-shirt is the fundamental technique for defining curl pattern without disruption.
Leave hair wrapped in the microfiber towel for five to ten minutes to absorb additional water, then allow to air dry partially before applying styling products.
Step 8: Detangling Wet Hair — The Right Tools and Technique
Detangling wet hair requires specific tools and a specific technique to avoid the breakage that is very easy to cause when hair is in its structurally weakened wet state.
The right tools:
A wide-tooth comb is the safest detangling tool for wet hair — its wide spacing allows it to glide through hair with minimal snagging and pulling. Avoid fine-tooth combs and regular brushes on wet hair — both create significantly more mechanical damage than wide-tooth combs.
A wet brush — designed with flexible bristles that bend rather than break through tangles — is a safe alternative to a wide-tooth comb and is particularly effective for very tangled or knot-prone hair.
The right technique:
Always detangle from ends to roots — never from roots to ends. Beginning at the roots and dragging a comb toward the tips forces every tangle encountered along the way to be ripped through rather than gently resolved. Beginning at the ends allows you to work through small knots progressively, moving upward only after each section is smooth.
Apply a detangling spray or leave-in conditioner to hair before combing — the slip provided by these products reduces the force required to move through tangles, dramatically reducing breakage.
Work in sections for thick or very tangled hair — clip sections away and work through one at a time rather than attempting to detangle all hair simultaneously.
Step 9: Air Drying vs. Blow Drying — Making the Right Choice
The decision between air drying and blow drying is not as simple as “air drying is always better” — a narrative that is pervasive in hair care conversations but not entirely accurate.
The truth about air drying:
Prolonged wetness is not harmless to hair. Extended periods of water exposure cause the hair shaft to remain swollen — and this prolonged swelling creates internal stress within the hair fiber that can weaken protein bonds over time. Hair that takes a very long time to air dry — particularly thick, dense hair — may actually sustain more internal structural damage from prolonged wetness than from a carefully executed blow dry.
Additionally, hair that is air dried while lying on a pillow, tucked under a collar, or exposed to wind and friction while damp sustains significant mechanical damage from rubbing against surfaces.
When air drying is the best choice:
For fine hair that dries quickly — within thirty to sixty minutes — air drying is genuinely the lowest-damage option when hair is allowed to dry without mechanical disturbance. For wavy and curly hair where heat disrupts the natural pattern, air drying with appropriate styling products is the preferred method.
When blow drying is appropriate:
For thick or dense hair that takes two or more hours to air dry, a carefully executed blow dry on a moderate heat setting with a heat protectant applied is likely less damaging than extended wet time combined with the mechanical damage of moving through daily life with wet hair.
Step 10: The Perfect Blow Dry Technique for Silk Results
When blow drying is the appropriate choice, technique and tools determine whether the result is silky smooth or frizzy and damaged.
Essential tool: The ionic hair dryer
Ionic hair dryers emit negatively charged ions that break down water molecules into smaller particles that evaporate from hair more quickly. They simultaneously neutralize the positive static charge that causes frizz, resulting in smoother, shinier hair compared to conventional dryers. If you blow dry regularly, an ionic dryer is the most impactful single tool investment you can make.
The non-negotiable: Heat protectant spray
Apply a heat protectant to damp hair before any blow drying. Heat protectants work by coating the hair shaft with a film of polymers that distribute heat more evenly, reduce the maximum temperature reached at the hair fiber surface, and protect the cuticle from the dehydrating effects of directed heat. No heat styling routine — blow drying, flat ironing, or curling — should ever proceed without heat protectant applied first.
The blow drying technique for silk results:
Begin by blow drying hair at approximately 70% dry on a medium heat setting without any attachment — simply directing diffused heat to remove the bulk of excess water before focusing on styling.
Once hair is approximately 70% dry, attach a concentrator nozzle to your dryer. Work in sections — clip the majority of hair up and work section by section from the bottom layers upward. Hold the dryer nozzle pointing downward along the hair shaft — directing airflow from roots toward tips. This direction of airflow encourages the cuticle scales to flatten rather than lift.
Use a round brush or paddle brush to tension each section as you dry it — guiding the hair smooth and straight as the heat sets the cuticle in its flat position. Move the dryer continuously — never hold it stationary on one section.
Finish each section with a brief blast of cool air — the cool shot button on your dryer — which sets the cuticle in its smooth, flat state and adds immediate shine.
Heat setting guidance:
Fine hair: Use the lowest heat setting — fine hair has a thinner cuticle layer with less thermal tolerance Medium hair: Medium heat setting is appropriate Thick and coarse hair: Medium to high heat setting — but always with heat protectant applied Damaged or color-treated hair: Always use the lowest effective heat setting regardless of hair thickness
Part Three: Protecting Silk Hair Between Washes
The work done during washing and drying is only preserved if equally intelligent protection is maintained between wash sessions.
Step 11: Applying Finishing Oils and Serums
A lightweight finishing oil or serum applied to dry styled hair serves multiple protective functions — sealing the cuticle against environmental humidity that causes frizz, adding the luminous sheen that defines silk hair aesthetics, and providing a barrier against pollution and UV exposure.
Best finishing oils for silk hair:
Argan oil is the gold standard finishing oil for most hair types — lightweight, non-greasy, and exceptionally effective at smoothing the cuticle surface and adding mirror-like shine. One to two drops warmed between palms and applied to the mid-lengths and ends is sufficient for fine to medium hair.
Camellia oil (Tsubaki oil) — used in traditional Japanese hair care — is another outstanding finishing oil with an extremely light texture and exceptional cuticle-smoothing properties.
For very thick or coarse hair, slightly heavier oils including marula oil or a small amount of pure cold-pressed olive oil can be used without creating greasiness.
Serum alternatives:
Silicone-based hair serums — containing dimethicone or cyclomethicone — create an exceptionally smooth, shiny surface by coating each hair strand with a thin polymer film. They are highly effective for immediate silk results and are particularly useful for managing frizz in humid conditions. However, with regular use they can build up on the hair shaft — make sure to cleanse thoroughly with a clarifying shampoo every two to four weeks if you use silicone-based products regularly.
Step 12: Protective Styling Between Washes
How you wear and handle your hair between washes significantly affects how it looks and how healthy it remains over time.
Loose styles over tight styles:
Tight hairstyles — ponytails, braids, buns, and updos that pull hair with significant tension — cause traction alopecia over time and daily friction damage along the hairline and at the elastic band contact point. Opt for loose styles wherever possible, and use fabric-covered hair ties (specifically satin or silk scrunchies) rather than conventional elastic bands.
Silk and satin accessories:
The material of hair accessories matters enormously for maintaining silk results. Cotton scrunchies and conventional elastic bands create surface friction that lifts the cuticle and causes breakage, particularly at the hair tie line. Satin and silk scrunchies have a smooth surface that glides over the cuticle rather than gripping and pulling — preserving the smooth cuticle surface you achieved during washing and drying.
Protective styles for length retention:
Loose braids, twists, and buns — worn gently without excessive tension — protect the ends of hair from environmental damage, friction, and manipulation. Tucking ends away in protective styles reduces the cumulative daily damage that shortens the length of hair over time.
Step 13: The Silk Pillowcase — Overnight Cuticle Protection
One of the simplest and most effective silk hair protection investments available is also one of the most overlooked: replacing your conventional cotton pillowcase with a silk or satin pillowcase.
Why the pillowcase material matters:
You spend approximately seven to nine hours in contact with your pillowcase every night. During that time — particularly if you are a restless sleeper — your hair is repeatedly sliding, rubbing, and catching against the pillowcase surface. Cotton pillowcases have a surface texture that creates significant friction with hair, lifting the cuticle, causing tangles, and contributing to the frizzy, rough texture that many people wake up with — commonly called morning frizz or bedhead.
A silk or high-quality satin pillowcase has a surface so smooth that hair slides across it without catching — maintaining the cuticle’s flat, smooth position overnight and preserving your silk styling results until morning.
Additional benefits:
Silk pillowcases also benefit skin — reducing the sleep creases that cotton pillowcases press into the face overnight. The moisture-wicking but non-absorbing property of silk means it does not draw moisture from hair or skin the way cotton does.
Alternatives to pillowcases:
If a silk pillowcase is not immediately accessible, sleeping with hair wrapped in a silk or satin bonnet, or wrapped in a silk scarf, achieves comparable protection. This technique is particularly important for curly and textured hair, where preserving the curl pattern overnight is as important as maintaining smoothness.
Step 14: Refreshing Hair Between Washes
Maintaining silk hair quality between full wash sessions requires a light-touch refresh routine that revitalizes without resorting to dry shampoo overuse or unnecessary manipulation.
The water mist technique:
A light mist of plain water or a water-based refreshing spray can revive flattened second-day hair — particularly for wavy and curly hair where the curl pattern needs reactivation. Apply lightly to hair and scrunch gently — then allow to air dry or use a diffuser attachment on low heat.
Dry shampoo — using it correctly:
Dry shampoo is one of the most useful between-wash tools available, but it must be used correctly to avoid the buildup that can compromise scalp health. Apply dry shampoo to the roots only — never to the lengths, where it creates unnecessary coating without benefit. Allow it to absorb for one to two minutes before massaging it in and brushing through — do not apply and immediately brush out, which wastes its absorbing effect. Use sparingly — maximum two applications between full washing sessions for most hair types.
Part Four: Long-Term Silk Hair Maintenance
Step 15: Regular Trimming — Ending the Damage Cycle
Split ends are the most visible form of hair damage — and they are progressive. Once a hair strand splits at the end, the split migrates upward along the strand over time, causing increasingly severe breakage if left unaddressed. Regular trimming removes split ends before they progress, maintaining the structural integrity of the hair fiber and preserving the smooth, sealed cuticle appearance that defines silk hair.
Trimming frequency:
For healthy hair being maintained: every eight to twelve weeks For hair actively recovering from damage: every six to eight weeks For hair in a protective growing-out phase: minimum every twelve weeks — longer intervals allow split ends to migrate, creating more damage that ultimately requires removing more length
Step 16: Nutrition and Hydration — Internal Silk Hair Support
No external routine can fully compensate for the internal nutritional deficiencies that manifest as dry, brittle, dull, or slow-growing hair. Silk hair is supported from within by the nutrients that the body uses to construct and maintain keratin — the protein of which hair is primarily composed.
Key nutrients for silk hair:
Biotin (Vitamin B7) supports keratin infrastructure — found in eggs, nuts, and sweet potatoes. Vitamin E provides antioxidant protection for the scalp and hair follicle environment — found in almonds, sunflower seeds, and avocado. Iron is essential for the oxygen delivery that supports hair follicle metabolism — deficiency is one of the most common causes of hair thinning and dullness, particularly in women. Zinc supports protein synthesis and scalp health. Omega-3 fatty acids from fish, flaxseed, and walnuts nourish the scalp and support healthy sebum production.
Hydration:
Hair is approximately 25% water by composition. Chronic systemic dehydration manifests in hair as dryness, brittleness, and lack of the suppleness that characterizes silk hair. Maintaining adequate daily water intake — two to three liters depending on body weight and activity level — supports hair hydration from within in a way that no topical product can fully replicate.
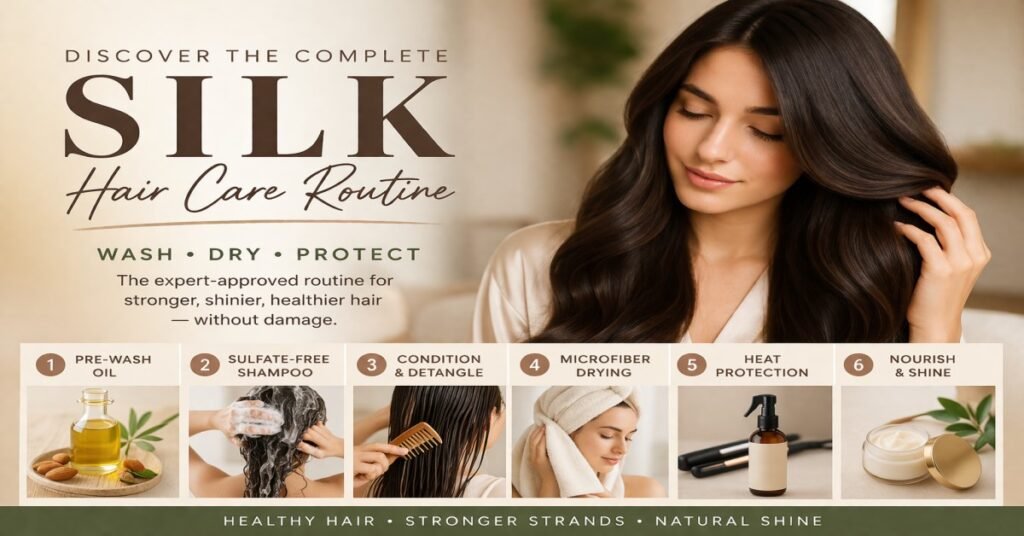
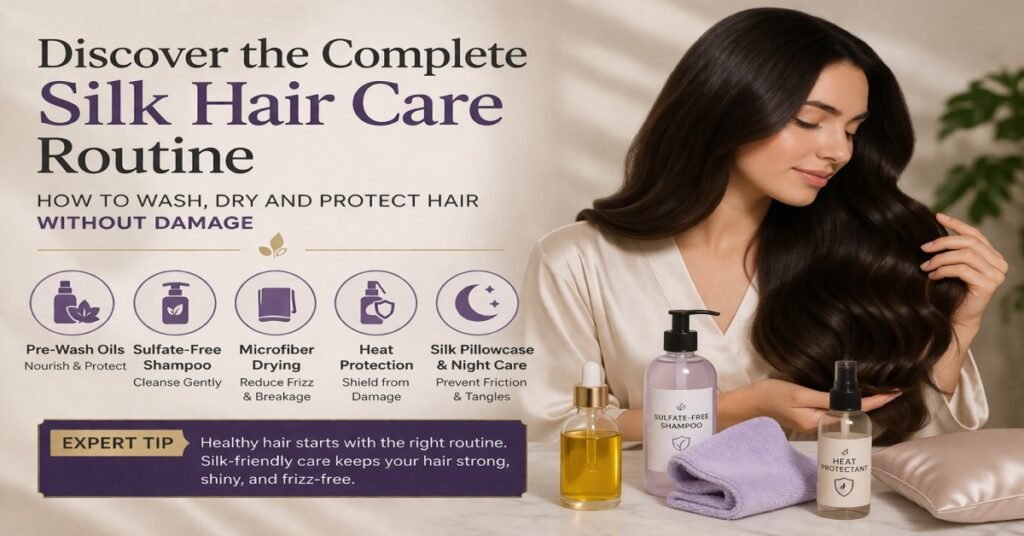
The Complete Silk Hair Care Routine at a Glance
Wash Day Routine: Pre-wash oil treatment → Scalp detox (weekly) → Lukewarm water rinse → Sulfate-free shampoo (scalp focus) → Rinse → Conditioner (mid-lengths to ends) → Deep treatment (weekly) → Cold water final rinse → Microfiber towel press → Wide-tooth comb detangle (ends to roots) → Heat protectant → Blow dry with ionic dryer (optional) or air dry → Finishing oil or serum
Between-Wash Routine: Satin/silk scrunchies for styling → Silk/satin pillowcase overnight → Dry shampoo at roots as needed → Water mist refresh for curls and waves → Loose protective styling
Weekly Additions: Scalp detox treatment → Deep conditioning or bond-building treatment → Hot oil treatment for intensive moisture
Monthly Maintenance: Clarifying shampoo wash to remove silicone and product buildup → Professional or at-home trim assessment → Nutritional and hydration review
Frequently Asked Questions (FAQs)
FAQ 1: How long does it take to achieve silk-smooth hair with a consistent routine?
The timeline for achieving noticeably silk-smooth hair through a consistent care routine varies depending on your starting hair condition, hair length, and how rigorously you implement the routine. For hair that is mildly damaged or simply lacking the right care approach, meaningful improvement in smoothness, shine, and manageability is typically noticeable within two to four weeks of consistent correct washing, conditioning, and drying technique. For hair that is significantly damaged — from bleaching, excessive heat use, chemical processing, or years of harsh product use — the timeline extends to three to six months, as the damaged sections of hair must grow out progressively from the roots while new, healthy growth is properly maintained. It is important to understand that topical treatments can repair and improve the appearance of existing damaged hair but cannot fully restore structurally compromised hair to its pre-damage state — truly silk-smooth hair on previously severely damaged lengths requires patience as healthy new growth replaces the damaged sections. Regular trimming to remove the most severely damaged ends accelerates this transition significantly.
FAQ 2: What is the most damaging mistake people make in their hair care routine?
Among all the common hair care mistakes, two stand out as particularly damaging in terms of frequency and impact. The first is using excessive heat without heat protectant — flat irons and curling wands can reach temperatures of 200 to 230 degrees Celsius, and applying this level of heat to unprotected hair causes immediate, severe cuticle damage and cortex protein degradation that is impossible to fully reverse. The second is rubbing wet hair aggressively with a conventional bath towel — this single habit lifts and damages the cuticle immediately after washing, when hair is in its most vulnerable state, and effectively undoes the benefit of careful washing and conditioning. Both mistakes are extraordinarily easy to correct — applying heat protectant before every heat styling session and switching to a microfiber towel with a pressing rather than rubbing technique are zero-cost behavioral changes that immediately improve hair quality. If you implement no other change from this guide, correcting these two habits will produce visible results.
FAQ 3: Is it better to brush hair before or after washing and why?
Hair should be thoroughly brushed and detangled before washing — never after washing while hair is still wet. Brushing dry hair before washing serves multiple purposes: it removes surface tangles that would become tighter and harder to manage when wet, distributes scalp oils through the mid-lengths and ends (providing natural pre-wash conditioning), and removes loose shed hairs that would otherwise tangle into a mat during the washing process. After washing, use a wide-tooth comb rather than a brush on wet hair — brushes apply more tension and cover more surface area simultaneously than combs, making them significantly more likely to cause breakage on structurally weakened wet hair. Once hair has dried to approximately eighty percent, a wide paddle brush with flexible bristles can be used gently for smoothing. Brushing fully dry hair is safe and beneficial — distributing natural oils, detangling, and stimulating scalp circulation — but the brush should always be introduced gently, starting from ends and working progressively upward to roots.
FAQ 4: Do silk pillowcases really make a significant difference to hair quality?
The difference that a silk or high-quality satin pillowcase makes to overnight hair quality is genuinely significant — particularly for people who are restless sleepers or those whose hair is naturally prone to tangles, frizz, or breakage. The science behind this benefit is straightforward: cotton pillowcase fabric creates surface friction that lifts the hair cuticle and causes mechanical damage during sleep. The cumulative effect of seven to nine hours of nightly friction, repeated every night over months and years, is substantial damage — particularly to the fine hairs around the hairline that are most prone to breakage. Silk and satin pillowcases eliminate this friction source. Users consistently report waking with hair that is smoother, less tangled, and better preserved from the previous day’s styling compared to sleeping on cotton. For those with curly hair, silk pillowcases also help preserve curl definition overnight — reducing the morning frizz and pattern disruption that cotton pillowcases cause. The investment in a genuine silk pillowcase — particularly one with a momme weight of nineteen or above for durability — is one of the most cost-effective hair care decisions available.
FAQ 5: Can I achieve silk-smooth hair without ever using heat tools?
Absolutely — and for many hair types, a heat-free approach actually produces superior long-term results compared to routine heat styling. The key is understanding that silk smoothness is fundamentally about cuticle health — and an intact, flat cuticle produces shine and smoothness regardless of whether it was achieved through heat styling or through heat-free methods. Heat-free silk results rely on a combination of careful washing and conditioning technique (particularly the cold water final rinse and proper conditioner selection), microfiber towel drying without friction, appropriate product choices (finishing oils, leave-in conditioners, and curl creams for wavy and curly hair), and overnight protection with a silk pillowcase. For straight and wavy hair, the cold water rinse combined with a smoothing serum and air drying with minimal manipulation produces excellent smooth results without heat. For curly hair, a well-executed heat-free routine — including the squish-to-condish technique, appropriate curl-defining products, and silk pillowcase protection — can produce defined, glossy, frizz-free curls that rival any heat-styled result. Heat tools, used occasionally and correctly with heat protectant, are a tool — not a requirement — for silk hair results.
FAQ 6: How do I maintain silk hair results in humid weather conditions?
Humidity is the arch-enemy of silk hair results — and managing it requires both preventive product application and strategic styling choices. The mechanism is straightforward: when atmospheric humidity is high, hair absorbs moisture from the surrounding air, causing the hair shaft to swell and the cuticle to lift — producing the frizz and puffiness that undoes silk styling results. The most effective anti-humidity strategy begins in the shower with a smoothing conditioner that contains humectants in appropriate concentrations — in high humidity, very high concentrations of humectants like glycerin can paradoxically draw atmospheric moisture into the hair shaft rather than sealing it. Look for conditioners and leave-in products specifically formulated for high humidity environments. Apply an anti-humidity finishing product to styled hair before exposure — options include anti-frizz serums with silicone or dimethicone (which create a moisture-impermeable barrier over the cuticle), or natural alternatives such as a very light application of argan or camellia oil that seals the cuticle surface against moisture penetration. Hairstyles that keep hair gathered and protected — sleek low buns, braids, and twisted styles — are more resistant to humidity-induced frizz than loose open styles, making them the most practical choice for high-humidity days when maintaining silk results through the day is the priority.